www.BioTopics.co.uk
Site author Richard Steane
The BioTopics website gives access to interactive resource material, developed to support the learning and teaching of Biology at a variety of levels.

Studying cells (with the microscope)

Types of microscope

Light microsopes - also known as optical microscopes

We normally see any object as a result of rays of light reflected from it into our eyes.

When we bring an object in for closer examination, the reflected light rays come from a wider angle into the eye. This change in angle is the basis for increased magnification. At this stage, we are dealing with angular magnification.
beetle_on_leaf (37K)

A (glass or plastic) lens refracts (bends) rays of light. Depending on its curvature, and the distances involved, it will deflect a range of light rays and bring them together into focus at a particular point at the back of the eye. A magnifying glass (convex in shape) thus produces the effect of seeing a larger image of the object by taking in light rays from a wider angle.

The Simple Microscope

Hand-Lens-300x241 (23K)

A magnifying lens can also be called a simple microscope. Field biologists often use lenses of this sort to examine specimens in more detail than can be seen directly.

It is important to hold the lens near to your eye, and then bring the specimen towards you in order to focus.

Looking back through time

The animalcule (?) man


AntVLscope (7K)
van Leeuwenhoek's microscope
Antonie van Leeuwenhoek (1632–1723) was a Dutch draper who used lenses to examine threads in fabrics.
He experimented with making his own lenses (but did not reveal all the details of his technique) and packaged them between metal plates, with screws to move specimens in front of the hole through which one could see them. In fact he made several hundred of these simple microscopes, and some are still on display today.

van Leeuwenhoek was able to see quite a few things no-one had seen before and some found his description of single-celled organisms controversial. He felt obliged to confirm his sightings and measurements so he invited local dignitaries (lawyers, church ministers, medics) to do so.

He examined microscopic life forms in water taken from local lakes, and in infusions made from peppercorns in water, and his description of dierkens [small animals] - translated into animalcules - inspired many others. At this time living organisms were not systematically classified as they are today. He described "eels" in his vinegar; these are now known as nematode worms. He also examined the anatomy of eels (the fish) and their blood. He looked at human blood and blood flow in capillaries, muscle fibres and other body parts as well as spermatozoa from animals. He is sometimes described as the father of microscopy, and bacteriology.

AvLplaquebugs (7K)
Diagrams of bacteria from teeth scrapings
van Leeuwenhoek recorded his observations in (several hundred) letters - all in Dutch. He corresponded with the Royal Society in London, who translated and printed them, and he was elected to the Royal Society in February 1680. He also published, sometimes in Latin, in scientific journals on the continent.

He was often keen to count the numbers of organisms he found, and to compare their dimensions with other microscopic creatures, but not often using standard units of measurement.

A number of influential people visited him, including the Russian Tsar Peter the Great, William III of Orange and his wife, Mary II of England who co-ruled England, Scotland and Ireland.

Interestingly, there was an overlap in time between two microscopists, on either side of the English Channel ..

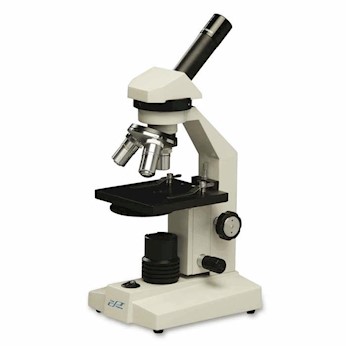
The Compound Microscope

Looking through two lenses which each give a magnification of x5 will result in a magnification of x25.
compound-microscope (21K)

Modern microscopes use a combination of lenses. In order to line these up and reduce aberrations, it is necessary to fix them in a tube, set at a certain distance apart. So as to permit focussing, there is a (rack and pinion) mechanism to move the whole tube up or down by a small amount. This is not like telescopes which may be focussed by moving one lens relative to another. There is generally a coarse focussing control with a larger knob as well as a fine focussing control, which has a smaller knob, and these are attached to a rack and pinion system.
This mechanical arrangement resembles a small battering ram, so be careful!

Different magnifications can be achieved by replacing the top (eyepiece) lens and/or the lower (objective) lens - which may be on a rotatable section. With a low-power objective lens there is usually a reasonable distance between the lens and the object you wish to look at: the specimen. However this distance is much reduced when using higher power objective lenses.

revolving_nosepiece (38K)
Most microscopes with revolving nosepieces are said to be parfocal - so that each objective lens is more or less in focus with the previous one. The margin of error gets much less with higher power lenses, so it is important to focus carefully and centre the specimen before moving to a higher magnification, and repeat the process before moving up to the next lens. Only the fine focussing control should be used at this stage. Getting in close with a high power objective also reduces the amount of light available. Examination of very small cells e.g. bacteria in 'smears' on slides may involve specialised oil immersion objective lenses. In this technique, a drop of oil is placed between the specimen and the lens itself. Focussing is rather critical and the oil has the effect of optically assisting the lens as well as bringing in more light. Without the oil these lenses do not give good results.

Microscopes of this kind may have one or two eyepieces (each giving the same image). With a double eyepiece there is no need to shut one eye, which some people find very inconvenient. Sometimes eyepieces are equipped with a pointer which allows a user to identify features for subsequent viewers, but the pointer does not actually poke into the specimen.

Microscopes usually have a fairly stable base and a flat section - the stage - on which specimens, usually mounted on a glass slide, can be held. Often this has controls to move the slide from side to side and up and down.


Cells, but not as we know them

Robert Hooke (1636-1703) was curator of experiments of the Royal Society and he did much work on the pendulum and springs which improved the accuracy of clocks.

Before this he worked in Oxford with Robert Boyle, constructing a number of air pumps - which contributed to the discovery of Boyle's law.

He applied himself to many aspects of science, and was also an architect acting as chief assistant to Christopher Wren, so he contributed to a number of buildings after the great fire of London. He had a fractious relationship with Isaac Newton who was President of the Royal Society.

Hooke_Microscope (35K)
Robert Hooke's compound microscope
Hooke used a compound microscope made by Christopher Cock, London, This had two or three lenses, but he removed the central one for more detailed study because it caused increased distortion of the image.

In 1665 he published Micrographia, a book describing observations made with microscopes (and telescopes). This does not actually include many graphics, but quite a lot of verbiage (link to digital copy below). This is set up by a grovelling acknowledgement to the King and the Royal Society. Evidently, Samuel Peyps was impressed with it, and described it as 'the most ingenious book that ever I read in my life'.
Hooke's cork (131K)
Hooke stated that these were the first microscopical pores he ever saw, or were perhaps ever seen!


Hooke is widely credited with coining the term cell for the small individual parts of living organisms, but he applied this to air-filled gaps in cork, which fascinated him on account of its physical characteristics of compressibility. He compared the structure to honeycomb and also used the terms pores, small Boxes and Bladders of Air, and he calculated their number in terms of area and volume (1257912000 per Cubick inch - 'a thing almost incredible, did not our Microscope assure us of it by ocular demonstration'). Bafflingly he said that this was more than ten times as many as the little Cells of several charred vegetables!

In fact (like van Leeuwenhoek) Hooke examined several samples of water that 'with a little standing' became covered with 'a lovely green' to see if they were like moss or seaweed and he concluded that he could not discriminate any form.
He presumably did not manage to find individual cells within the algal film.

He was given to making sweeping statements, such as "by the help of Microscopes, there is nothing so small as to escape our inquiry".

Stereo (dissection) microscopes

oxd3184400kb (73K)
These have two eyepieces, lined up with separate lenses below, so each eye sees a slightly different view of the specimen, and the brain interprets this as a 3-dimensional object rather than the flat image from other microscopes. Stereo microscopes offer less magnification, but they are very useful with (solid) specimens showing lots of detail like flowers, bugs etc.

Some dissection microscopes offer a choice of objective lenses so the overall magification can be varied, but there is not usually the same sort of range which is give by an ordinary microscope. However there is a decent space between the objective lens and the specimen, and the focussing is easier so the whole viewing experience is much more intuitive.

More lenses, less aberrations

Further improvements in lenses

Glass lenses refract light of different wavelengths differently, causing images to have fringes of various colours - chromatic aberration. However in the 1730's it was found that combining two lenses ('flint glass' and 'crown glass') with different refractive properties and shapes cancels this effect.

In 1830 Joseph Jackson Lister (father of Joseph Lister who famously introduced the concept of antisepsis within hospitals) worked to improve on lens design and he showed that spherical aberration - different refraction angles at edges compared with the centre - is reduced by accurate alignment of lenses at set distances apart.

Illumination

Depending on the specimen, light is either shone through it or allowed to bounce off it. Most ready-prepared slides contain thin (slices of) material which is fairly transparent. Small organisms often appear visible as result of contrast with the liquid medium in which they are suspended. A beam of light is sent from below using a condenser - a series of lenses and controls beneath the stage to vary the illumination. There is usually an iris - a disc with a variable-sized hole in the centre - to control the intensity of the light, and possibly focussing and centralising controls for the beam of light.
Some microscopes have systems here which provide different sorts of illumination: phase contrast, dark field and polarising are useful in various contexts, especially with live, moving specimens like protozoa.

It is worth pointing out that with microscope slides we are sending a beam of light through the specimen (transmission), but with specimens under the dissecting microscope we are using both eyes to see the result of the 2 distinct beams of light bouncing off the specimen (reflection). The brain interprets the subtle differences between each viewpoint to give the impression of depth. This is stereoscopic vision.

This distinction (transmission/reflection) is also important in electron microscopy.
DownPhaseContrast (57K)
This is a view of bird's down feather, illuminated by phase contrast

Royal blood?

Live-blood-2-300x169 (29K)
This is (live) blood, seen using dark-field illumination. White cells are very well displayed here.
Courtesy Scientific Instruments and Optical Sales


TEMschematic (27K)
The transmission electron microscope


Electron microscopes

Here a stream of electrons is passed through or bounced off the specimen. This has an effective wavelength much less than light, so it produces images with a higher resolution. Electrons are given off from a heated element, and as they are electrically charged they are attracted to, and accelerated towards a positively charged plate. This depends on serious physics and technology; it can only occur in a vacuum, and high voltages (kilovolts) are needed, together with refrigeration. The specimen to be examined is placed into position via an 'air-lock',

The stream of electrons leaving the specimen can be deflected as it passes between electrically charged plates and through electromagnetic coils which act as lenses, effectively bringing it to focus. The electrons may strike a screen coated in compounds which glow and produce light, but this is monochromatic, i.e. not coloured in its own right. With modern equipment it is normal for images to be captured electronically and directed to a computer screen. The image may be electronically processed (colorized) to produce the illusion of colour: 'false colour' images.

Some questions:

Why is a vacuum necessary?
> It removes gas molecules from air, which would absorb/scatter electrons
Why is the em not suitable for use with living specimens?
> Vacuum - so no air, water drawn out, and specimen would probably burst
Why is refrigeration necessary?
> Flow of electrons is an electric current, which has a heating effect


Is it a particle? Is it a wave?

Light comes in particles called photons, which have energy and no charge.

Electrons are a different sort of particle, with energy and (negative) charge, as well as a known (admittedly rather small) mass.

Both these particles can act as waves (this is called wave-particle duality), and these waves have a De Broglie wavelength .

The wavelength associated with a photon is 700-1000 times the De Broglie wavelength of an electron of the same energy. This means that a stream of electrons can discriminate between much smaller objects, and potentially give images which are sharper (higher resolution).

Transmission Electron Microscopy

With TEM the beam of electrons passes through the specimen, which is usually mounted on a metallic grid. Some regions allow the electrons to pass through easily; these show up as light patches on the screen. Other 'electron dense' parts appear noticeably darker in the final image. The image is effectively flat and shallow, and gives a sectional view.
Animal cell
TEM_Avian_LMH_cell (104K)
This is an ultra-thin section of an avian LMH liver cell (hepatocellular carcinoma from chicken Gallus gallus). At the top the nucleus can be clearly seen, with many mitochondria (darker) below.
Courtesy City of Hope cancer hospital
Plant cell
MPCELL (297K) This is a section through a photosynthetic plant cell. Notice the central nucleus, and four chloroplasts (darker) round the edge. Between them a couple of mitochondria are visible.
Courtesy Miami University Department of Botany

False colour image

Ebola_in_ovary (1033K)

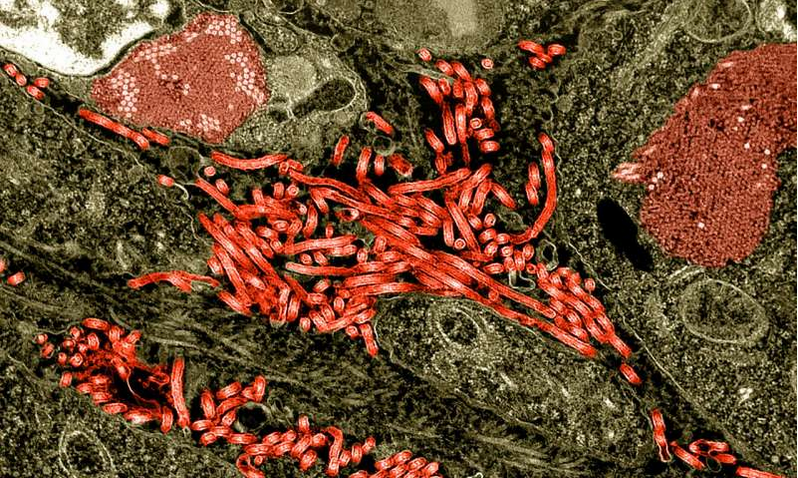
Colorized transmission electron micrograph of the ovary from a nonhuman primate infected with Ebola virus. Characteristic filamentous Ebola virus particles are present between cells (bright red). Intracytoplasmic Ebola virus inclusion bodies forming crystalline arrays can be seen within ovarian stromal cells (darker red).
Credit: NIAID

Scanning Electron Microscopy

With SEM the beam of electrons passes over the outside surface of the specimen, and the resulting reflected stream of electrons gradually builds up to give an image which emphasises the variations in surface texture. It is capable of more subtle variation in tone (than TEM) and thus shows the texture of the surface, giving the impression of depth.
However it does not give a true 3-D or stereoscopic effect like the (optical) dissecting microscope because it does not give a slightly different perspective to the left and right eyes.


Macroscopic SEM SEMweevil (231K) Scanning electron micrograph close-up of a weevil (Curculionidae family) - its snout is just over 100 microns wide.
Dartmouth College Electron Microscope Facility
Microscopic SEM acanthamoeba (56K) Acanthamoeba polyphaga
PIXNIO - free images
Plant cells and tissues SEMwalnut_leaf (175K) Scanning electron microscope image of a leaf from a Black Walnut tree. Image shows a cross-section of a cut leaf, its upper epidermal layer, mesophyll layer with palisade cells and vascular bundles, and lower epidermal layer. The protrusion at center is just over 50 microns tall.
Dartmouth College Electron Microscope Facility


Scanning electron microscope setup


SEMsetup (195K)
Courtesy Pacific Northwest National Laboratory

Cryo Electron Microscopy

Vesicles form from membrane coated with a with a three-legged protein - clathrin
Clathrin_cage_viewed_by_croelectron_microscopy (65K)
A clathrin cage with a single triskelion highlighted in blue. CryoEM map EMD_5119 was rendered in UCSF Chimera and one clathrin triskelion was highlighted.
This is a fairly new technological process by which samples of biological molecules in solution rapidly frozen at low temperature can be used to visualise molecular structures in much greater detail - a 'resolution revolution' which does not require crystals - the end of X-ray crystallography!

It has been claimed that the process is superior to X-ray crystallography in that less material is required, and it can be less stable and less pure. It is said to be applicable to molecules that are intractable to other techniques.

Cryo-Electron Microscopy Facility

cemf-bannerimage-1 (139K)
UT Southwestern medical centre

Preparation of specimens for observation under the microscope

Biological material often has to be processed to make it suitable to be seen under the microscope.

There are a few exceptions to this:

Small living organisms such as protoctista (Amoeba, Paramecium, etc) can be seen within a drop of water on a slide (and under a coverslip) using a light microscope. Their movement is especially interesting, if a little difficult to follow! And before long the illumination often also heats and dries up the specimen, with lethal effect!

Small pieces of biological material, e.g. cell scrapings, plant leaf, can be simply placed on a microscope slide, generally in a drop of liquid (perhaps diluted stain) and covered with a thin glass coverslip before being placed under the microscope.

In each of these cases, the coverslip serves several functions: to partially seal the specimen onto the slide and reduce drying, and to present an even and undistorted upper surface to the objective lens which would otherwise adversely affect the image produced.

Paramecium - a moving image


Fixation

Pieces of biological material are immersed in a liquid (fixative) which preserves it in a life-like state, and prevents further changes. It effectively stops enzyme activity, prevents microbial decay and hardens it somewhat. Formalin (a solution of formaldehyde) is commonly used; glutaraldehyde is an alternative.

Sectioning

Microtome-Ribbon-on-Leica-Microtome-Medical-Equipment-Source3 (535K) Here a strip of embedded sections is coming off a microtome
Thin layers may need to be produced, and this can be achieved using sharp blades - metal or specially broken glass. A machine called a microtome (similar to a bacon slicer!) may be used to produce serial sections. This can be more easily performed if the biological material is embedded in a block of material. For light microscopy, wax (similar to candle wax) is often used, whereas with electron microscopy it is more normal to use (epoxy) resin.

Freeze fracture and freeze etching (for SEM only)

freezefracture (463K) Freeze fractured suspension of cultured kidney epithelial cells originally extracted from an African green monkey (Chlorocebus sp.)
M...Mitochondria, N...Nucleus, NP... Nucleopores, G...Golgi, PM... Plasma membrane.

Courtesy of Peter Wild, Institute of Veterinary Anatomy, University of Zurich, Switzerland.
These techniques are effective in displaying the structure of cell membranes, and internal structures. Specimens are frozen in liquid nitrogen, then the ice block is cracked - not a very controlled process! The (two) exposed surfaces can be coated with a layer of carbon and platinum, then the underlying specimen material is digested and washed away. The remaining platinum film can be examined using a scanning electron microscope.

It can reveal the location of proteins spanning the phospholipid bilayer, and details of features such as nuclear pores.

Staining

Staining is often used to increase the contrast in the image seen. Different parts of a cell may react differently with the compounds used.

With light microscopes, various coloured dyes can be used, and this can assist in distinguishing different structures within cells. There are many examples of these, with usefully descriptive names:

Acridine Orange
Brilliant Green
Methylene Blue
Toluidine Blue

Other stains are more selective and can be used for particular purposes.

X_chromosome (2K)
Giemsa stain is specific for the phosphate groups of DNA, attaching itself to regions of DNA where there are high amounts of adenine-thymine bonding. It stains chromosomes, resulting in Giemsa banding (G-banding), and is often seen in karyograms (chromosome maps). It can also identify chromosomal aberrations such as translocations and rearrangements.


With electron microscopes, stains are not coloured. They are mostly heavy metals. In fact they are 'electron dense' - even as salts - and they mostly increase the contrast in transmission electron micrographs, or act as a negative stain, darkening spaces between electron transparent sections in specimens.
All of these compounds are listed as irritant , corrosive or toxic.

Examples include:
Ammonium molybdate. Negative stain
Indium trichloride. Metal stain for nucleic acids.
Lead citrate. The most widely used (and cheapest) metal stain for ultrathin sections.
Osmium tetroxide is strongly attracted to membranes, and acts as a fixant. Used with TEM and SEM Uranyl acetate. Very toxic, as well as radioactive. Universal stain for thin sections, in-block staining and negative staining.


In scanning electron microscopy, specimens are often coated with a thin layer of metal, by the evaporation of metal from a heated filament, usually in a vacuum chamber. This is called sputtering. Surprisingly gold is often used for this but other metals like tungsten, iridium, or chromium may be used. When electrons interact with specimens they can cause buildup of charge and uneven heating - this is is reduced by the metal coating.


Mounting

In optical microscopy, slides can be made permanent by adding a clear resin-like substance (followed by a coverslip) which hardens and allows the material to be re-examined later - perhaps years later. Sadly this sometimes crystallises a few more years later.
Single stains in light microscopy
Mast cells (granulocyte white blood cells) in skin tissue
mast_cells_toluidine_blue (305K) Toluidine blue is a useful general stain for nuclei. Toluidine blue staining also visualizes proteoglycans in cartilaginous tissues because of its high affinity for the sulfate groups in proteoglycans.
Endosperm cells from corn seed
starch_grains (38K) Iodine solution (or more correctly iodine in potassium iodide solution) can be used to identify starch grains in plant cells.

Combined light microscope stains
Stomach wall 105175_hematoxylin_Eosin_stomach[105175_hematoxylin_Eosin_stomach-ALL] (61K)

This section is stained with haematoxylin-eosin (H&E), the most widely used histological staining technique. Nuclei are stained blue with haematoxylin, and eosin is a red counterstain for proteins, collagen, keratin, and other intercellular substances.
Delignification of wood by fungi
delignification (217K) Astra-blue stains unlignifed cellulose blue, and safranin stains lignin red. This section shows delignification starting from the lumen (arrowheads) and intact fibers surrounded by attacked fibers (arrow).
Bar: 25 µm


Magnification and resolution

It would be a mistake to simply take the power of the eyepiece and the objective lens, multiply one by the other and claim that as the magnification in use, as that is really just in the back of the eye. But it is sometimes useful to know what magnification was used, as well as 'low power' or 'high power'.

Increasingly we are using TV and computer screens, projectors and smart phones and so there may be several other (magnification) factors to be applied.

If we draw a microscopic section, we rarely portray the whole (circular) image - just a selected portion, and different people draw different sized images on different sized sheets of paper.
And then if a drawn image or photomicrograph is copied or printed, its magnification factor is likely to be lost. It is best to overlay a bar on (or to one side of) the image to show the dimensions, as this would be scaled up or down if the image is displayed elsewhere.

Calculation of actual size from images

Magnification = size of image/ size of real object
so
Size of real object = size of image/magnification

Don't forget: 1 mm = 1,000 µm [= 1,000,000 nm].
It is best to measure images in mm (not cm).

Resolution

These days we are all aware of the idea of resolution, in terms of the quality of a TV or computer picture, and it is often expressed in terms of the numer of pixels displayed per unit distance or area.

In microscopy the resolution is defined as the shortest distance between two points on (the image of) a specimen that can still be distinguished by the observer or electronic display system as separate entities.

The amount of detail seen depends on the wavelength of the light used to illuminate the specimen. It is said that with a good version of the ordinary light microscope the best resolution you can expect in theory is 200nm (half the wavelength of the light being used - in this case the blue end of the spectrum). This is 0.2 µm.

With the electron microscope the effective wavelength is up to about 1000 times shorter than light, so the resolution can be down to 0.2 nm.

Not New Year's Resolution

Sunflower
Can you see what it is yet?
Mouseover the arrows to increase the definition
. . . . . . . . . . . . . . .

Using stage and eyepiece micrometers to measure the size of an object viewed with an optical microscope

An eyepiece graticule scale
graticule (19K)
An eyepiece lens may be fitted with a graticule - a scale with divisions, usually across the contre of the field of view, and it may be called an ocular micrometer. This may have numbers on it, but they do not mean anything at this stage, and of course there are the different objective lenses which give different overall magnifications. The eyepiece graticule needs to be calibrated by reference to a stage micrometer.

A stage micrometer is like a slide, but more expensive! Sometimes it is encased in a black or metallic mount. Across the central section is an often rather small but accurately printed set of divisions, with dimensions as set out on the micrometer or the box in which it is supplied.

stagemicrometer (4K)

By placing this on the microscope stage and focussing, both should be visible together.
It is a fairly simple matter to line up one against the other and calculate the conversion factor for the eyepiece-objective combination in use. Mouseover the text beneath these images.

calibration (76K)
Image courtesy www.researchgate.net


For the 10X objective, 10 divisions on the ocular micrometer line up with 11 small divisions (0.11 mm) on the stage micrometer (and 30 ocular with 33 stage) so each small division on the ocular scale is equivalent to 0.011 mm - 11 µm.

For the 40X objective, 51 divisions on the ocular micrometer line up with 12 small divisions (0.12 mm) on the stage micrometer so each small division on the ocular scale is equivalent to 0.00235 mm - 2.35 µm.

Comparison between the transmission electron microscope and the optical microscope

You are expected to know the principles behind the operation of optical microscopes, transmission electron microscopes and scanning electron microscope, as well as their limitations.

The most obvious task is to compare the normal light microscope with the transmission electron microscope (both of which produce an image as a result of passing different forms of energy or minute particles through the specimen being examined).


Another mouseover exercise

Transmission Electron
Microscope (TEM)
Optical
microscope
uses electrons light [photons]
principles of operationelectrons pass through / enter (thin) specimen
denser parts absorb more electrons so appear darker
light passes through (transparent sections of) specimen
light of different wavelength passes through so parts of image are coloured
magnification
not usually credited
in exam answers!
greater (up to 1,000,000x?) less (500-1000x)
resolution
& reason
greater/finer (down to 0.2 nm)
electrons have short wavelength
less (down to 200nm)
light has longer wavelength(s)
detail visible
in cell organelles
greater - e.g. internal detail of membranes in mitochondria and chloroplasts, E.R., Golgi and vesicles- even ribosomes! less - gross external detail only
for nuclei, - maybe mitochondria, chloroplasts (& Golgi ?) if you are lucky
status of specimens only dead/dehydrated live possible
image colour no intrinsic colour
(shades of grey only)
own colour of specimen/
stain visible
specimen preparation more complex/ difficult /
more likely to produce artefacts
less complex
section thickness must be thinner sectioning not always essential
focussed using(electro)magnets glass lenses

Separation of cell components

You may wish to obtain pure samples of mitochondria or chloroplasts for examination under the microscope, or for use in investigations of respiration or photosynthesis. Perhaps you would use muscle (heart?) or liver as a source of mitochondria, and for chloroplasts lettuce or spinach.
This involves two processes: cell fractionation (breaking apart cells, releasing their contents) and ultracentrifugation (spinning them at different - fairly high - speeds to separate the organelles).

Yet another mouseover exercise

Stage in process Reason
Cut into small (1cm) chunks or squares
and just cover with liquid which is:
(see below)
... isotonic solution to prevent damage to mitochondria / chloroplasts /organelles
{not whole cells which will soon be burst!}
... kept cold using ice bath to prevent/reduce damage by enzymes
... buffered (pH between 6.7 and 7.4) to prevent protein/enzyme denaturation (by acid?)
Homogenise animal material with blender/ grind plant material with pestle and mortar to break open cells and release intracellular organelles
Filter using muslin or coarse filter paper to remove (large) debris or whole cells
Centrifuge filtrate (at lower speed/1000 g) to separate nuclei/cell fragments/ heavy organelles
Re-centrifuge supernatant/after nuclei/pellet removed at higher speed (3000g) to get mitochondria/chloroplasts in pellet/at bottom

Another microscopic comparison


And another!

Transmission Electron Microscope (TEM) Scanning Electron Microscope (SEM) Dissection microscope (stereo microscope)
Stream of electrons passes through specimen and directly onto screen Stream of electrons passed from side to side across specimen
- secondary electrons reflected/scattered from surface of specimen
- require to be collected and integrated to give image
Light reflected (in all directions) from surface of specimen
- may be lit from above or below, or both
specimen is thin layer (sectioned), on grid in middle of vacuum chamber specimen is not sectioned (may be left whole), on stud at bottom of vacuum chamber specimen is not sectioned (may be left whole and alive)
and in fresh air!
parts of specimen contain electron-dense stains metallic coating on surface no need for stain
shows internal detail within cells shows external view only shows external view only (but may be used for wide angle view of slides)
preparation has more stages: fixation, staining, embedding, sectioning fairly simple preparation (except freeze fracturing/etching) no processing required
flat 2-D image image gives impression of depth - but is not truly stereoscopic image gives good impression of depth - truly stereoscopic
(separate light path and images for left and right eyes)
controls to move image to left/right and up/down image can be moved or rotated specimen can be moved by the thumbs
greater magnification: 1,000,000 x
resolution 0.2 nm
slightly lower magnification: 100,000 x
resolution 2 nm
much lower magnification: up to 70 x
resolution irrelevant

Real or artificial?

The process of preparing specimens for examination under the (light or electron) microscope can result in the production of odd images which are confusing.

These are generally decribed as artefacts.

Sometimes with the light microscope artefacts are caused by precipitates in stains, or problems with section cutting. They can even be seen by people who have not set their microscopes up correctly.

The Golgi body/apparatus (first described in 1898!) was a source of debate to some light microscopists who thought that the use of osmium tetroxide or silver salts had created some sort of visual anomaly, but its layered membranous structure gradually became more acceptable as the electron microscope was used more from the 1950's onwards.

However artefacts have been the cause of much discussion within the scientific community when first coming to terms with electron microscopy. Objects such as mitochondria were gradually seen in greater detail and some scientists questioned the significance of the images obtained (by other workers). The concept of the 'stalked particle' was in fact a bone of contention for some time in the 1960's. The structure and function of ATP synthase is now quite well accepted.

Artefacts are much more common in specimens treated with certain fixatives. Membranes may be damaged, or infiltrated with stains to produce effects similar to structures which are credible.

Case in point: mesosomes

Not all you see in books is true

mesosome (18K)
The name mesosome was given to infoldings of the plasma membrane observed in gram-positive bacteria that have been chemically fixed to prepare them for electron microscopy. They were first observed in 1953 by George B. Chapman and James Hillier, and the term "mesosome" was coined by J. D. Robertson in 1959.

It was originally thought that they had a function in cell wall formation or respiration, by by analogy with cristae in mitochondria. But cells that were frozen did not show this morphology.

They have not been considered to be true structures since 1976, but they are still shown in some books and on some websites.

Other related topics on this site

(also accessible from the drop-down menu above)

Similar level
Eukaryotic cells

Simpler level
Using the microscope

Web references

A Bug's Life Let's explore for mini-beasts!

The NHBS Guide to Hand Lenses

Fixation methods for electron microscopy of human and other liver - great TEM and SEM images, and references to artefacts

Ocular-micrometer-calibration - Thank you Researchgate

Lens on Leeuwenhoek - documented facts about Leeuwenhoek's life and times

Leeuwenhoek's ‘animalcules’, just as he saw them 340 years ago from New Scientist

Antonie van Leeuwenhoek From Wikipedia, the free encyclopedia

Vinegar Eels - YouTube video of nematode worms squirming in vinegar

Micrographia: or some physiological descriptions of minute bodies made by magnifying glasses : with observations and inquiries thereupon - Robert Hooke
[ University of Wisconsin-Madison History of Science and Technology Collection
- Digitally scanned copy - Don't forget that the letter s can be confused with f on these pages, and do not rely on the converted page text - it seems that Optical Character Recognition does not work well with early print, and nobody seems to have checked it personally!]

A Simple Method That Uses differential Staining and Light Microscopy To Assess the Selectivity of Wood Delignification by White Rot Fungi - EWALD SREBOTNIK AND KURT MESSNER

Mesosome From Wikipedia, the free encyclopedia

Artifacts in Histologic Sections

TEM – Transmission Electron Microscope - an astonishing Lego version (with all parts labelled!) from Boise State University

Microscopy Resource Center

Public Domain Images PIXNIO - free images

Ebola virus infects reproductive organs in monkeys

History of Microscopes

Microscope DARK FIELD - Scientific Instruments and Optical Sales (Australia)

Examples from Core Projects City of Hope, a leading research and treatment center for cancer, diabetes and other life-threatening diseases.

Cryo-Electron Microscopy Facility - UT Southwestern medical centre

The Golgi Apparatus (Complex)-(1954-1981) from Artifact to Center Stage MARILYN GIST FARQUHAR and GEORGE E PALADE

Mesosomes in Escherichia coli 1968 report about E.coli fixed with osmium

www.BioTopics.co.uk    Home     Contents     Contact via form     Contact via email     Howlers     Books     WWWlinks     Terms of use     Privacy